Simplicity 3782: A Ren Faire Costume

SIMP3782

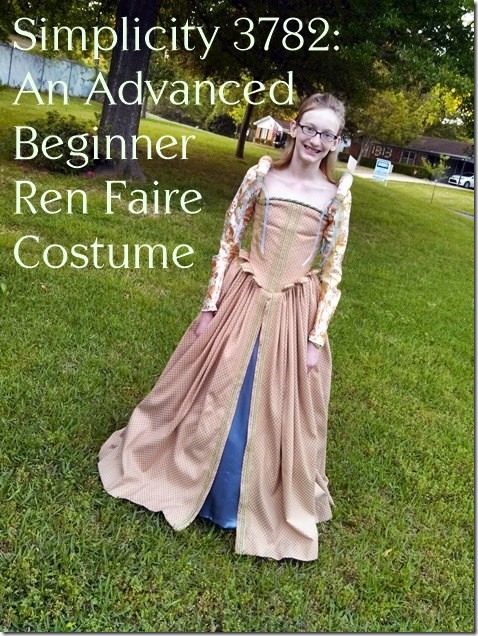
We needed a Ren Faire costume.  The 6th grader needed to dress as Isabella d’Este, an Italian Renaissance noble woman.  This lady: isabella d'este
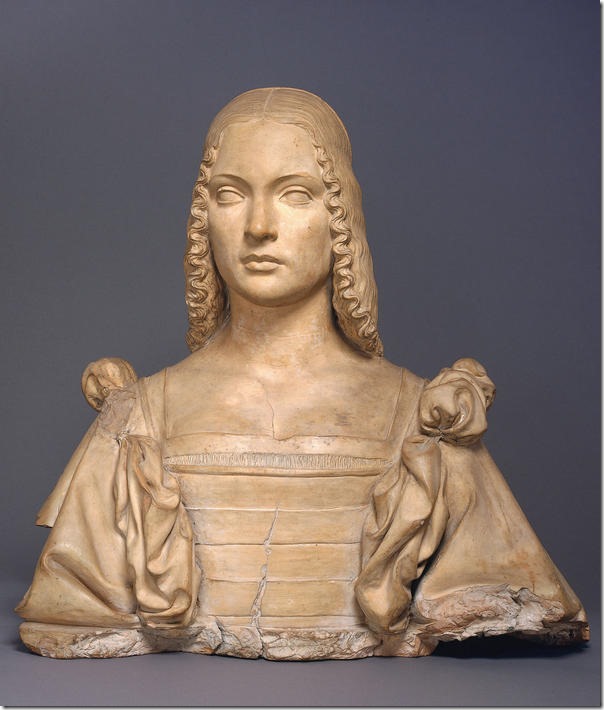
We could have purchased a crushed velour costume that looked like most of the others.  But, this Momma can sew!

Here’s my review of  Simplicity 3782

Description:  Misses’ Elizabethan Costume (dress, underskirt, bum roll)

Sewing level:  Advanced beginner (Really.  I promise.)

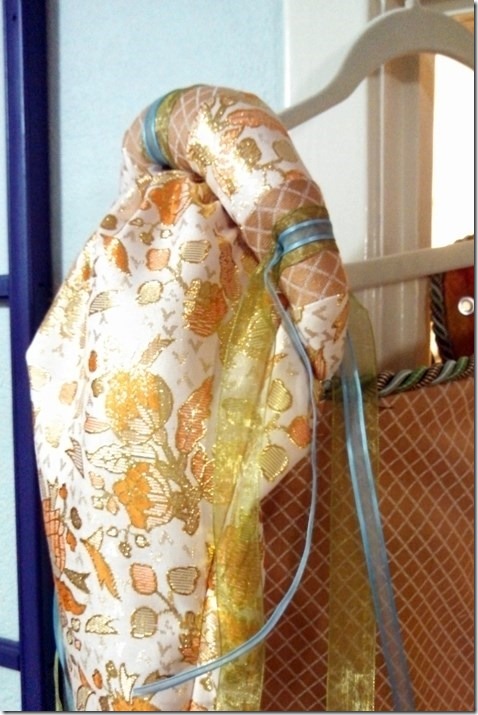
Addie’s favorite element:  The shoulder rolls!

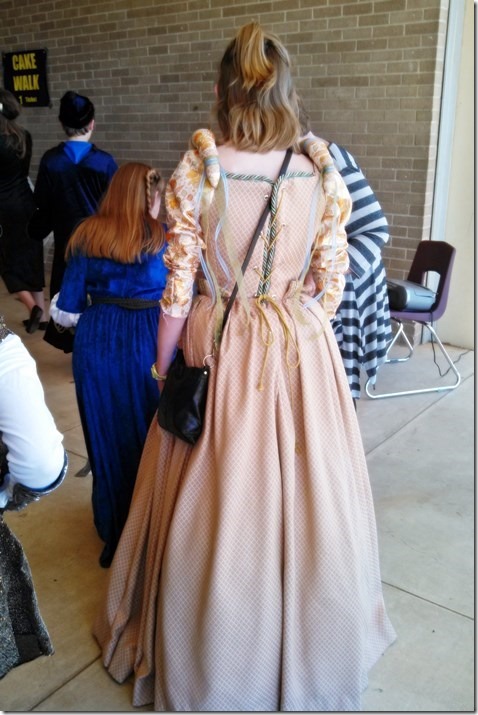
My favorite element:  The shoulder rolls.   (And the bum rolls.  It gave the back of this heavy dress the perfect poof.)

IMG_20140420_204725_721

Addie’s least favorite element:  It was heavy and hot.

My least favorite element:  Sewing the skirt to the bodice.  Pleats, gathers, boning, heavy fabric.  Wasn’t impossible but very difficult.

Biggest change:  We really didn’t change anything about the construction of the dress.  We did adjust the trim placements to work with our choices.  We left off some of the lace on the front for a simpler look but embellished the shoulder rolls with ribbons to mimic a dress we saw in one painting of Isabella d’Este.

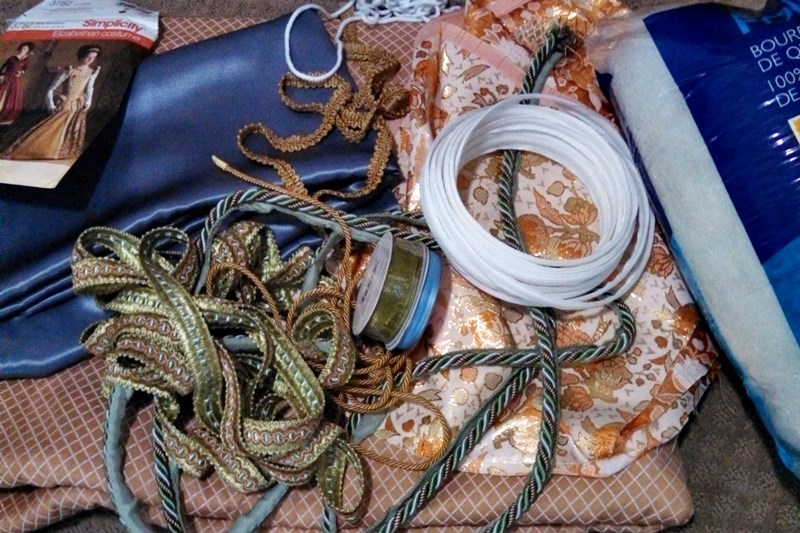
Fabric:  Addie selected all the fabrics for the dress at one of our local fabric stores.  It was fun watching her choose the fabrics because she knew what she wanted, but she’s also frugal like her Momma.  She found the shiny brocade first.  Knowing it might not wear well, I encouraged her to use it for the sleeves.   She stumbled onto the peachy/brown upholstery fabric and loved it.  I was thrilled to find it was on clearance for $3.99 !  This meant we could spend more on trims!  The underskirt front panel is a crepe back satin and the other panels are white broadcloth.  The green/blue/orange trims were chosen to pull all the colors together.  If you plan to make this dress, remember that it has no modern closures.  Grommets, cordings, and grosgrain ribbon are musts.

IMG_20140419_165353_478

Pattern:  I followed the written instructions and found no problems with them.  The pattern pieces were also easy to use/understand.  There were A LOT OF PIECES.  The dress went together easily, but beware:  upholstery fabrics can get heavy!  The shoulder rolls were the part I was most concerned about, but they sewed together nicely.  I hand tacked on the ribbon trim that we added. Boning is not scary.  I repeat, boning is not scary.  The instructions were easy to follow.  Essentially, you are just making vertical casings.  And don’t try to skip it.  The boning gives the structure that Elizabethan costumes are known for. When it came time to attach the skirt to the bodice, I enlisted my hubby’s help.  He held the skirt fabrics so that the weight wasn’t working against me.  It did take me two tries to match the trims! We borrowed a poof for her to wear under the skirts.  And the bum roll is a MUST!  It poofed (is that even a word?) the back of the skirt just enough.

IMG_20140425_125627_318

Conclusion:  Costumes aren’t hard.  This one took about 12 hours to complete.  It was basically a lot of straight seams.  I stitched it up on my little Janome 9-stitch—proof that you don’t need a big fancy machine to make a beautiful garment.  The fabrics can get pricey.  Watch for sales.  Addie made some great choices and we spent less than $100. However, it would be easy to spend upwards of $250 just on the fabric and trims.  If you’re looking for cheap and quick, just buy one.  If you are looking for a costume that will stand out and be a treasure, try this one.

Make Your Own Skirt Pattern, Part 2

Ready to make a skirt that fits you beautifully?  Let’s get started.  You’ll need your measurements, some freezer paper or tissue paper, and a ruler.  A dressmakers’ curve would also be helpful, but it’s not totally necessary.

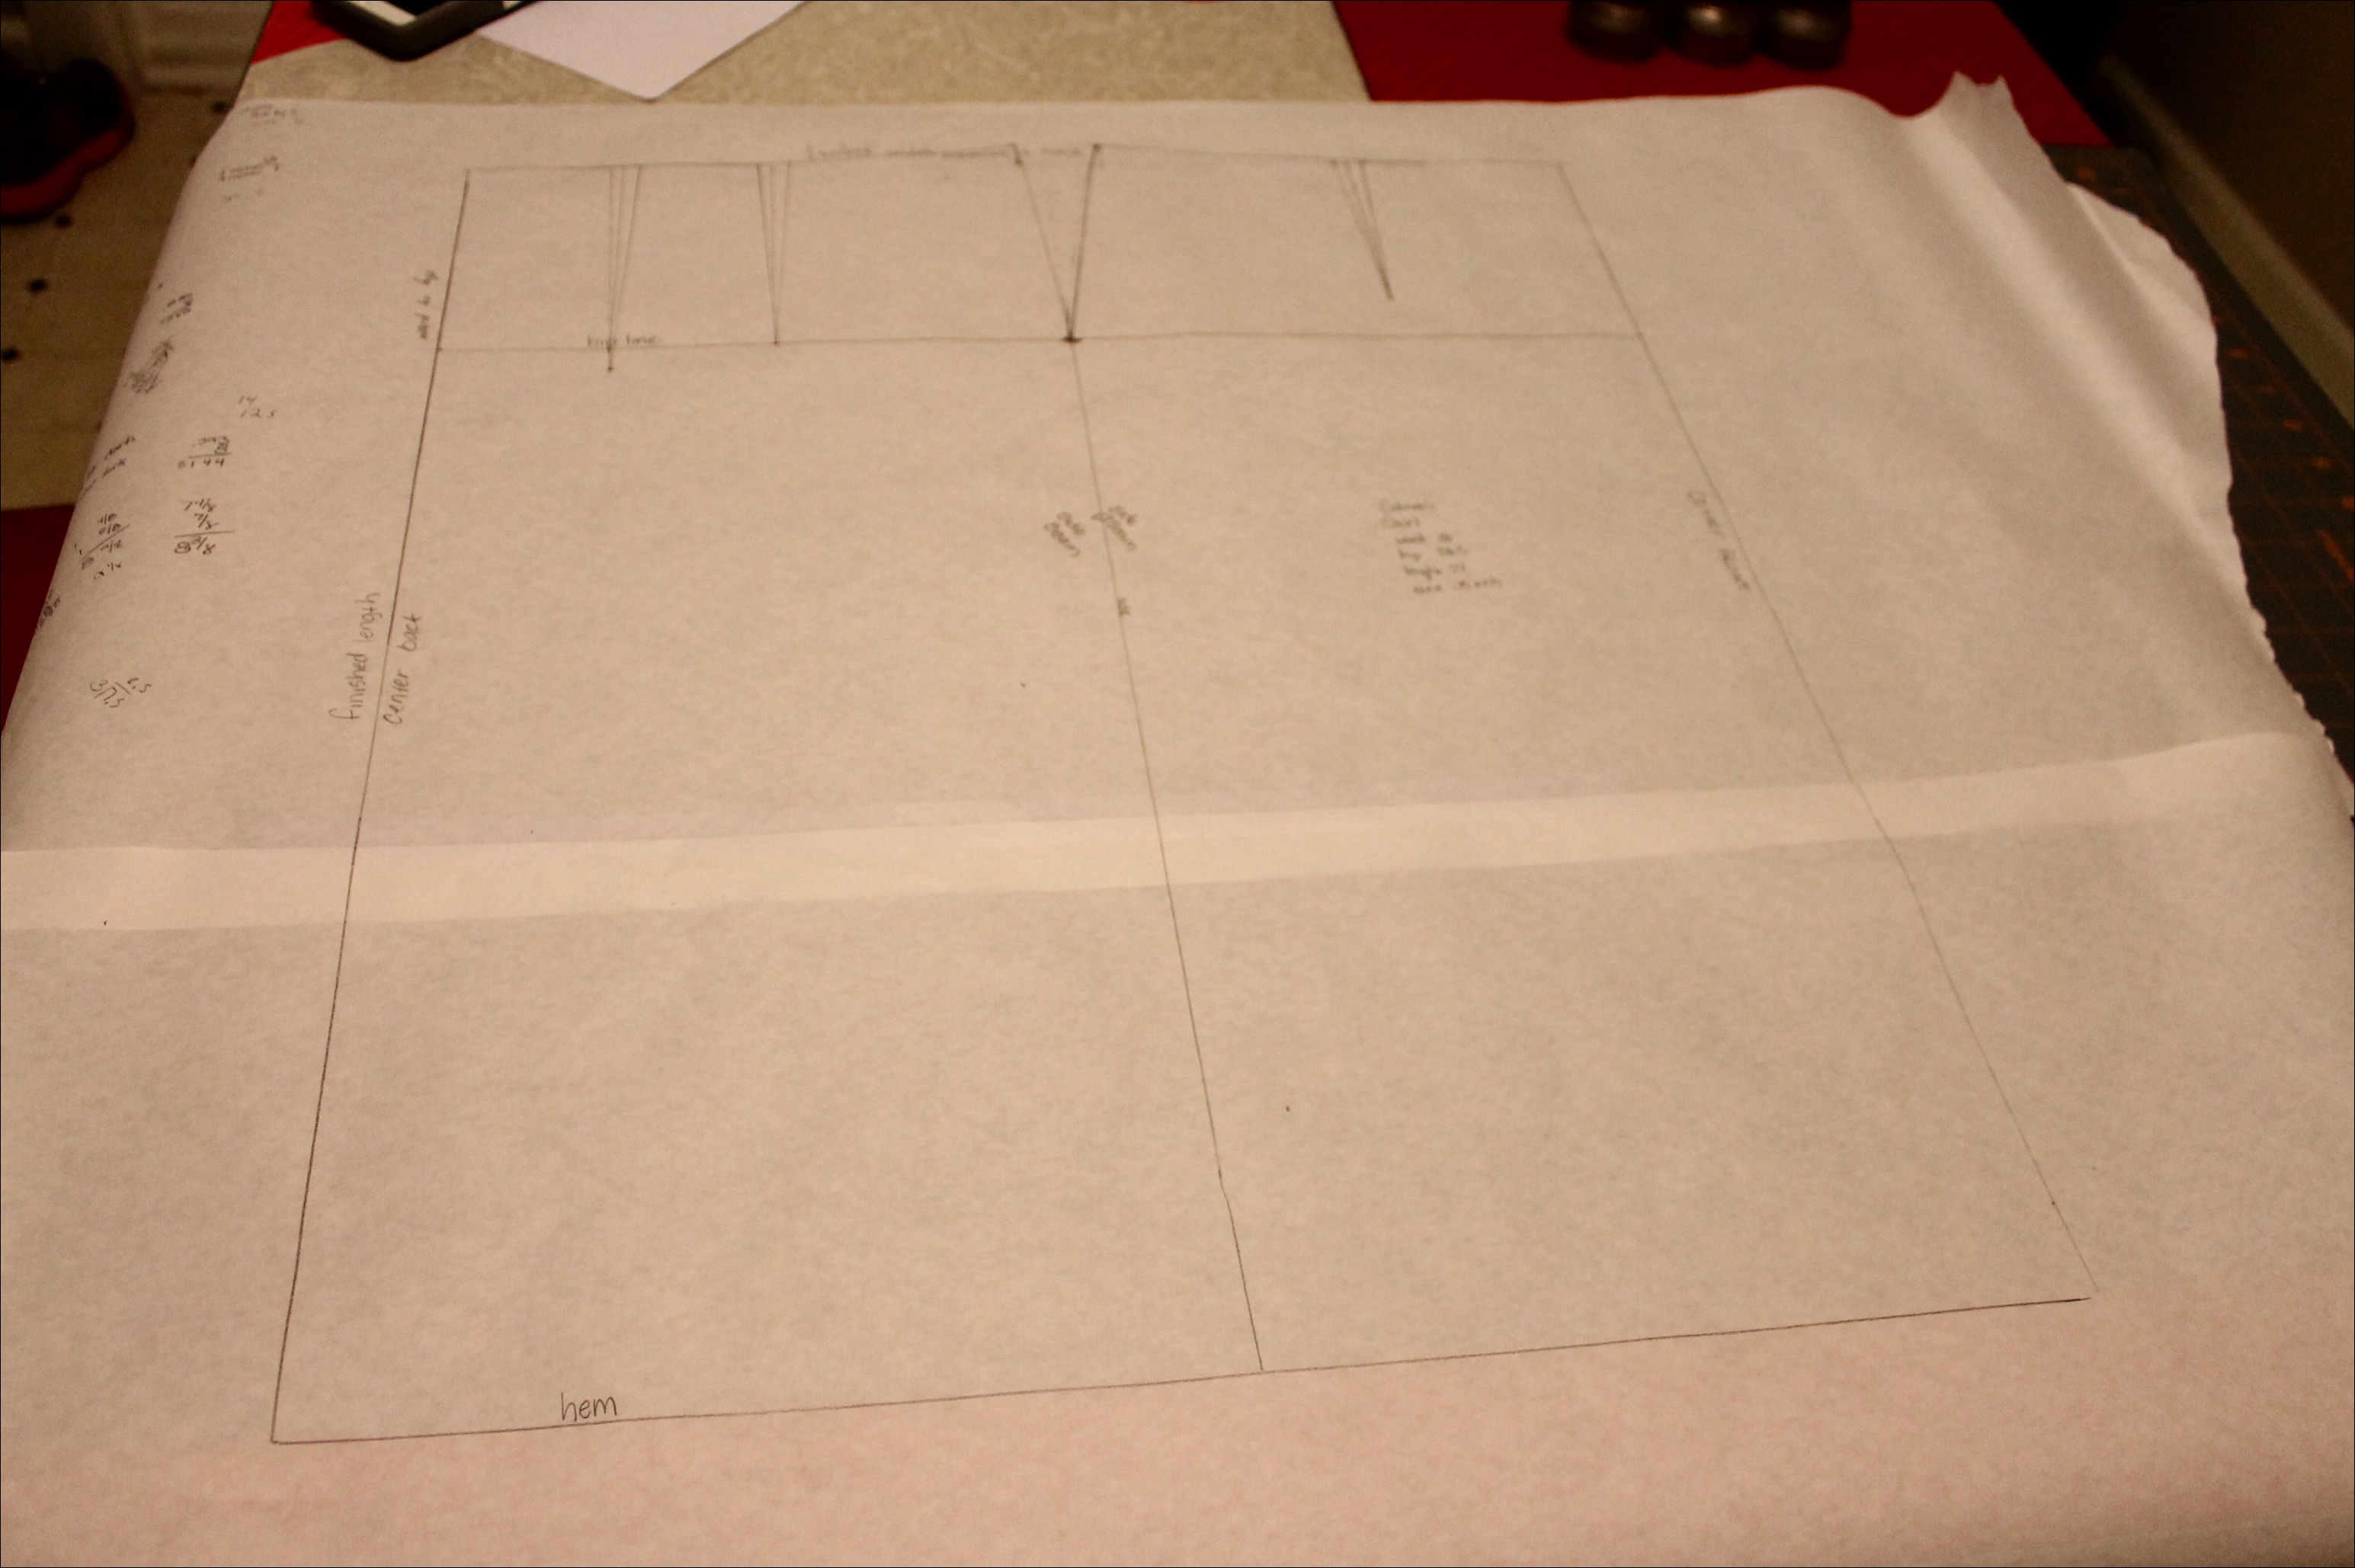
Here’s my sloper.  I use two pieces of freezer paper taped together for the width.

IMG_8226

So here’s how you do it:

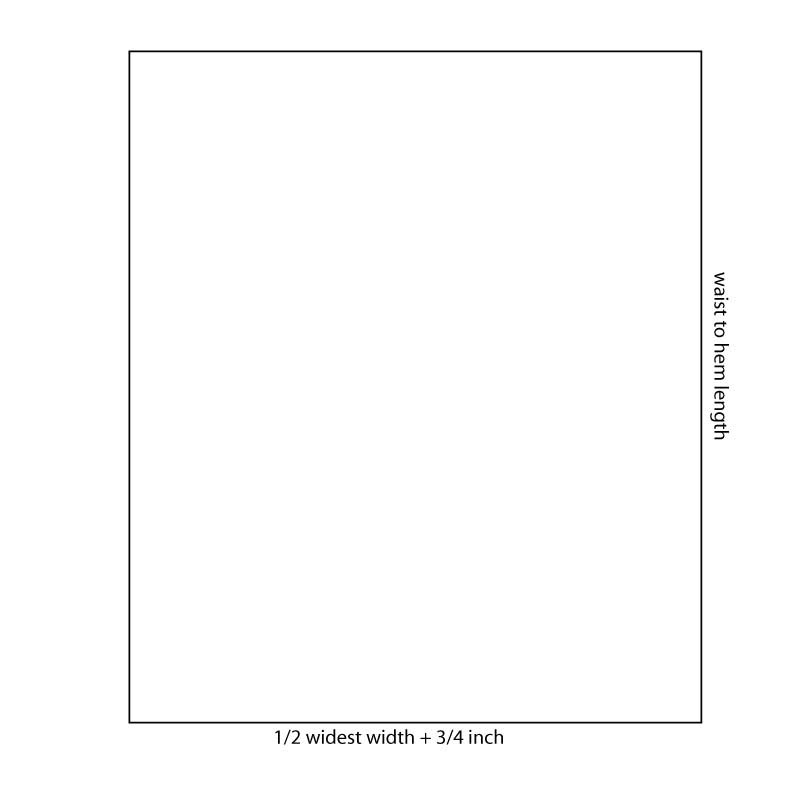
1.  Draw a rectangle.  The rectangle should be as long as your waist to hem measurement and as wide as 1/2 your widest width. 

Skirt-Tute-step-1

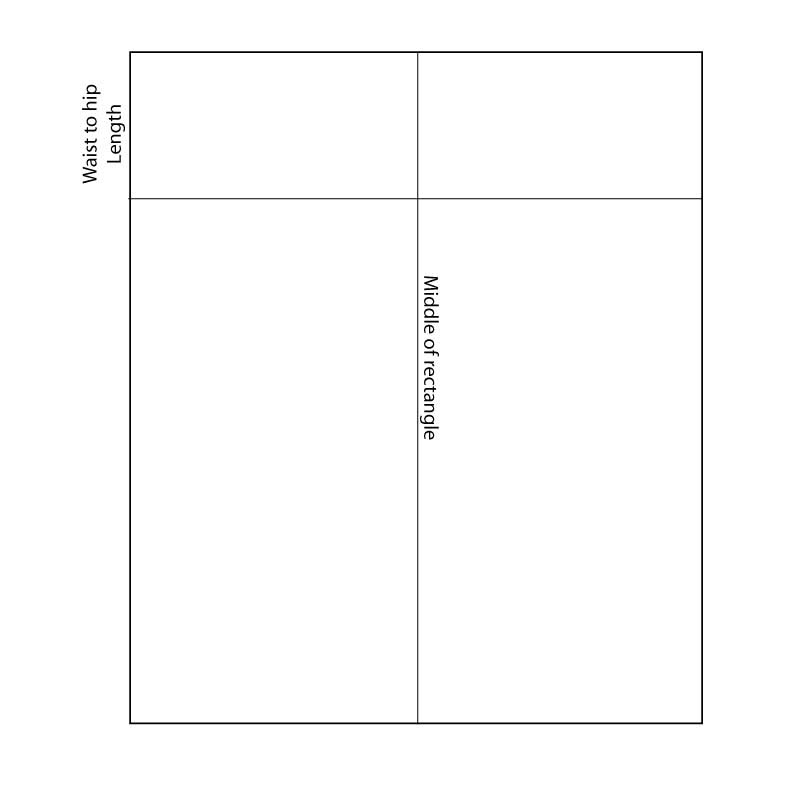
2.  Draw a line from top to bottom down the center of your rectangle.  Draw a second line across your rectangle at your hip measure.  This line should be down from the top the distance of your waist to hip measurement. 

Skirt-Tute-step-2

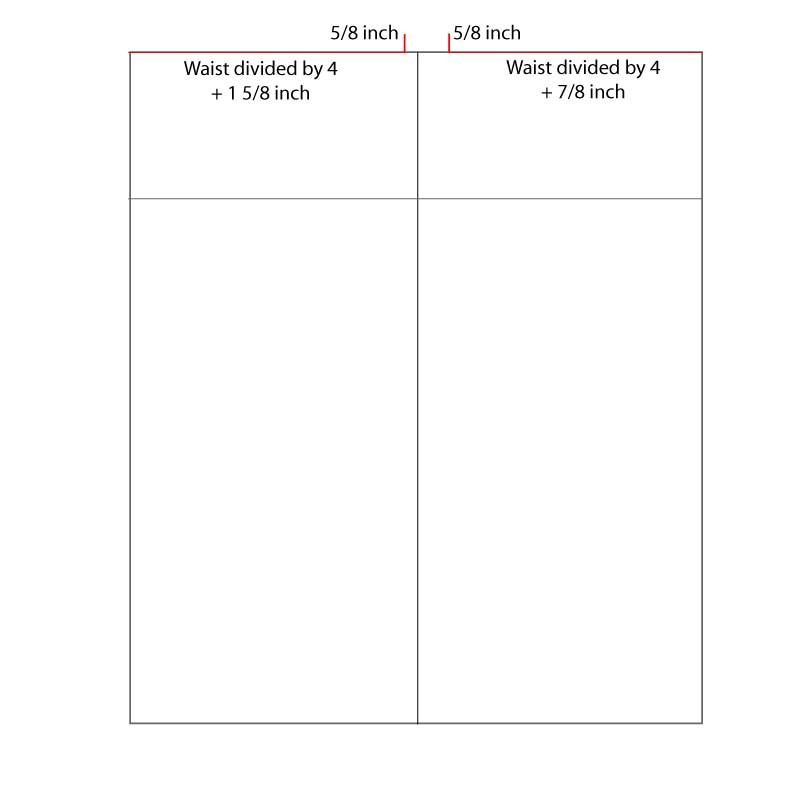
3.  Now we are going to start drawing the waist.  Divide your waist measurement by 4.  Add 1 5/8 inch to this measurement.  Make a mark that distance from the LEFT edge along the top.  Draw a small line up 5/8 inch up from there.  Now, add 7/8 inch to 1/4 your waist measure.  Make a mark that distance from the RIGHT edge along the top.  Draw another small line up 5/8 inch from that point.Skirt-Tute-Step-3

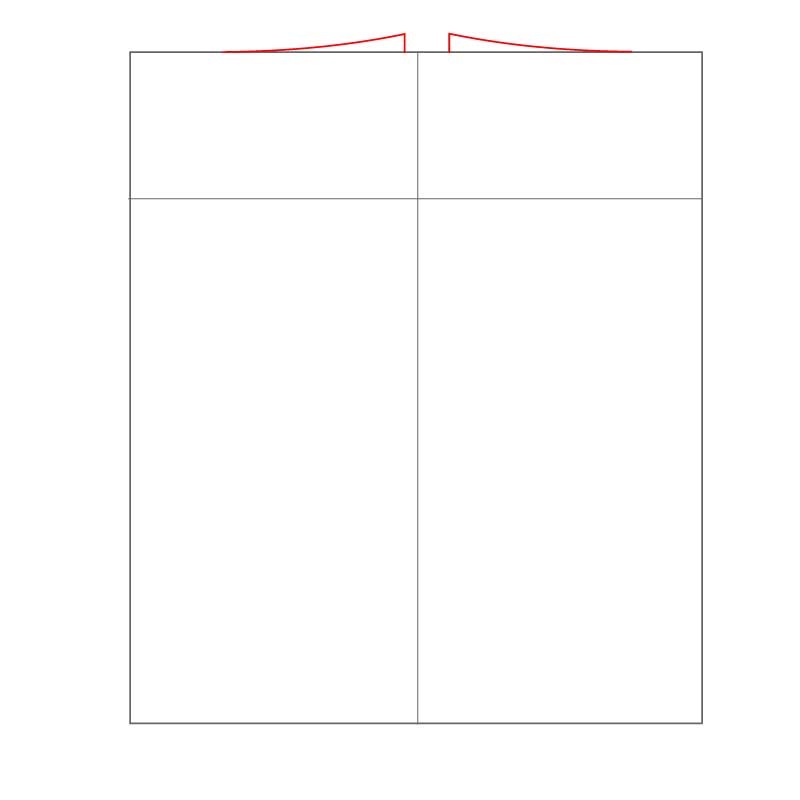
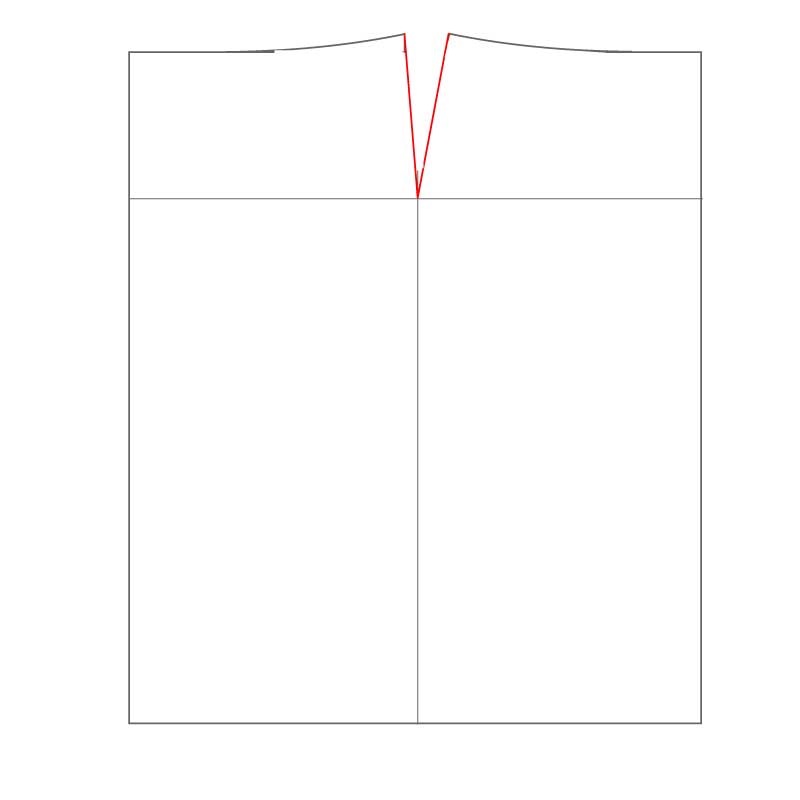
4.  Now we need to create our waist curve using these new lines.  Draw a curving line from the center of each narrow rectangle to connect with the top of the small line you drew up from the waist line.  A dressmaker’s curve will help, but if you don’t have one, just do your best.Skirt-Tute-step-4

5.  Time to connect your waist to your hips.  Your waist to hip line may have more curve than mine.  That’s fine if it does.  That’s why we are making our own personal skirt pattern.  To do this, draw a slightly curved line from the top of your waistline to your hip point (where your hip line intersects your midline).  Mine is almost straight because my waist is not a whole lot smaller than my hips.  Yours may be.skirt-tute-step-5

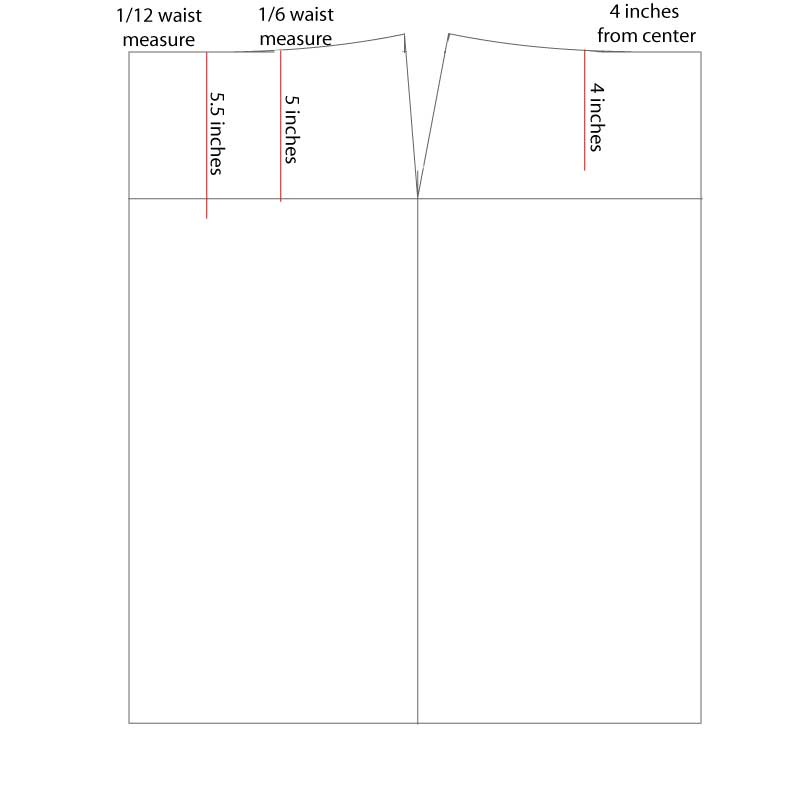
6.  Time to draw the darts.  The darts are how this flat piece will fit our curves.  Let’s work on the darts on the left first.  Divide your waist measurement by 12.  Measure in this distance from the left edge.  Draw a line 5.5 inches down from this point.  For the second back dart, divide your waist measurement by 6.  Draw a line 5 inches down from this point.  Now for the front darts.  Draw a line 4 inches down, 4 inches from the right edge.

skirt-tute-step-6

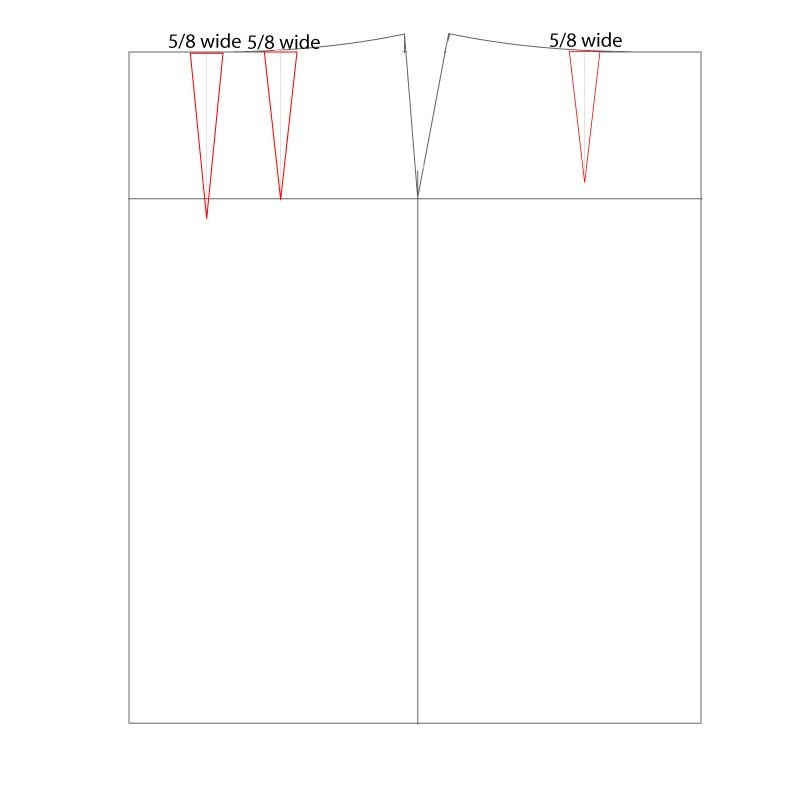
7.  Now to make these lines into darts, just draw triangles.  The base of each triangle is 5/8 inch wide and is centered over your dart line.  The base is along your waistline and the point of the triangle should touch the bottom of your dart line.  skirt-tute-step-7

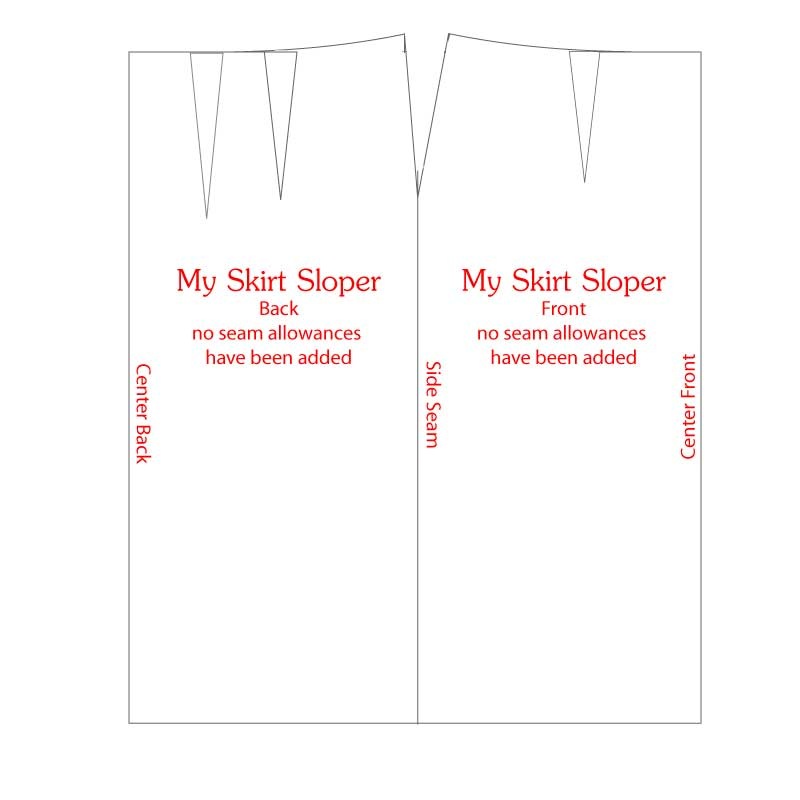
8.  Almost done!  Label your sloper.  Here are the labels I use.skirt-tute-step-8

So…how’d you do? 

Here’s your assignment for next time:

1.  Cut out your sloper.  Don’t forget to cut down that center line, separating your front and back pieces.

2.  Trace both pieces of your sloper onto another sheet and add 1 inch around each piece.  Be sure to trace your darts too.

3.  Grab some fabric to make a muslin (a practice skirt).  You can raid your stash or grab something from the remnant bin at your favorite shop.  You’ll need 1 1/2-2 yards (basically, 2 x your waist to hip measure).

Home of Needles, Nuts, and Bolts Sewing Classes and Personality Children's Clohtes